• Using dsh to Transfer Files to Multiple Machines

    If you need to transfer a config file to multiple remote machines, dsh will make your life easier. Check out my previous post about dsh if you need more info about setting up dsh.

    First, let’s look at the example file we plan on transferring:

    $ cat example-file
    example file line 1
    example file line 2
    

    We will pipe the output of that file to a dsh group using the -i and -c options. Let’s look at the docs for those options first.

    --concurrent-shell | -c
           Executes shell concurrently.
    
    --duplicate-input | -i
           Duplicates the input to dsh process to individual process
           that are remotely invoked.
    

    Now, let’s use those options to tee the contents to a file on the remote servers:

    $ cat example-file | dsh -g ex-group -i -c 'tee ~/example-file'
    server-2: example file line 1
    server-2: example file line 2
    server-1: example file line 1
    server-1: example file line 2
    server-4: example file line 1
    server-4: example file line 2
    server-3: example file line 1
    server-3: example file line 2
    

    You will notice that the output is in random order due to the -c concurrent option. Let’s check our work using -w so that the output is in the proper order:

    $ dsh -g ex-group -w 'cat ~/example-file'
    server-1: example file line 1
    server-1: example file line 2
    server-2: example file line 1
    server-2: example file line 2
    server-3: example file line 1
    server-3: example file line 2
    server-4: example file line 1
    server-4: example file line 2
    
    read more →
  • SSH Config Includes

    OpenSSH version 7.3 introduced a very handy Include feature, which is great for people who have to manage connection info for multiple servers. This makes it easy for me to generate updated SSH configs via AWS CLI for the multiple EC2 instances that serve Adafruit IO.

    Here is how you can use Include to pull in separate SSH config files from your main ~/.ssh/config. First, you will need to install OpenSSH version 7.3 or higher. If you are using Linux, you will need to install version 7.3+ via your package manager (yum,apt-get, etc), or build it from source.

    On OS X, you can do this via homebrew:

    $ brew install homebrew/dupes/openssh
    

    Confirm that you are now running 7.3 or higher by running ssh -V:

    $ ssh -V
    OpenSSH_7.3p1, OpenSSL 1.0.2j  26 Sep 2016
    

    Now you can create a new child config file in ~/.ssh using a text editor. For example, we can create an example child config at ~/.ssh/pi_config and add configuration info just as we would in the main SSH config file:

    Host pi-1
      HostName 10.0.0.10
      User pi
      IdentityFile ~/.ssh/pi_cluster
    
    Host pi-2
      HostName 10.0.0.11
      User pi
      IdentityFile ~/.ssh/pi_cluster
    
    Host pi-3
      HostName 10.0.0.12
      User pi
      IdentityFile ~/.ssh/pi_cluster
    

    From your main ~/.ssh/config, add the following line at the top:

    Include ~/.ssh/pi_config
    

    You should now be able to connect to your servers as you normally would:

    $ ssh pi-1
    

    That’s it! Check out this OpenSSH feature request if you would like more info about the new feature.

    read more →
  • Tricking Instagram's Audio Fingerprint System with Infrasound

    I recently attempted to share an old video of one of my dogs on Instagram, and I immediately received this notice via email after upload:

    We’ve removed the video you posted at 12:24 PM on September 18, 2016 because it included the following content:

    Gun Street Girl by Tom Waits

    If you have permission to share everything in the video including the audio, like the soundtrack or music, you can appeal the removal and have your video re-posted. Remember that people should only post videos they have the right to share.

    I understand why sites like YouTube and Instagram need to block unauthorized use of copyrighted works, but I think that it’s overkill to block non-commercial use of a short piece of audio in a puppy video. I can’t speak for Tom Waits, but doubt he’s going to mind if he doesn’t get license fees for the small number of people (30-40) that hear a short clip of his song in my post. It’s not like I’m uploading a full album, or even a full song.

    I normally would have just moved on and not posted the video, but I was curious if there were some ways around the audio fingerprint system. My initial thought last night was that I could overlay a subaudible tone, and hopefully that would be enough to trick their system. When I woke up this morning, I did a bit of searching and I was unable to find any examples of this approach, but I was able to find some other methods that people have tested with YouTube’s Content ID system. These methods include reversing the song, altering the pitch, altering the playback speed, resampling, applying noise, volume changes, and tweaking the stereo imagery.

    The author of the article concluded:

    It is quite possible to thwart the YouTube Content ID system, but some methods mangle the song too much to be used in anything useful.

    I decided I’d give my infrasound method a try, so I loaded the video in Audacity. Here’s what the original track looks like:

    original track

    I then added a new stereo track, and generated a 1Hz sine wave at 0.8 amplitude. Here’s what that track looks like:

    sine

    Here’s what the two tracks look like mixed together:

    mixed

    I played the track back on my laptop and phone, and couldn’t hear a difference between the source track and the new track with the 1Hz sine wave overlaid. It passed the ear test, but the real test was to upload it to Instagram.

    It works! You should see the 1Hz test video above unless Instagram manually removes the video. The nice thing about this approach is that there is no discernible difference between the source and modified tracks. I’ll be testing this method with YouTube’s Content ID system in a follow-up post.

    read more →
  • Hardware Testing with Jenkins & TAP

    Jenkins CI

    At Adafruit, when we push or merge changes to one of our hundreds of Arduino libraries on GitHub, we have to ask ourselves “Does this change work?”. In a lot of cases, the best answer we can give, even after extensive manual testing, is “Maybe?”. For Adafruit IO, it is important that we are able to easily answer “Yes.” to that question. A large portion of Adafruit IO users could be impacted by a bug in a library such as the Adafruit IO Arduino Library, and we want to make sure our client code is reliable.

    The hard truth is that there aren’t enough hours in the day to test each change to every library on all of the supported platforms, so most of the time we have to settle with testing one or two platforms manually, and hoping for the best on the rest of the supported platforms.

    What do we mean by platform? In this case, we are talking about the multiple microcontrollers that are supported in the Arduino IDE via the Arduino 1.6.x Third Party Hardware Specification. Arduino Uno, ESP8266, Feather M0 (ATSAMD21), and the Feather WICED (STM32F205) are all good examples different platforms that require separate testing.

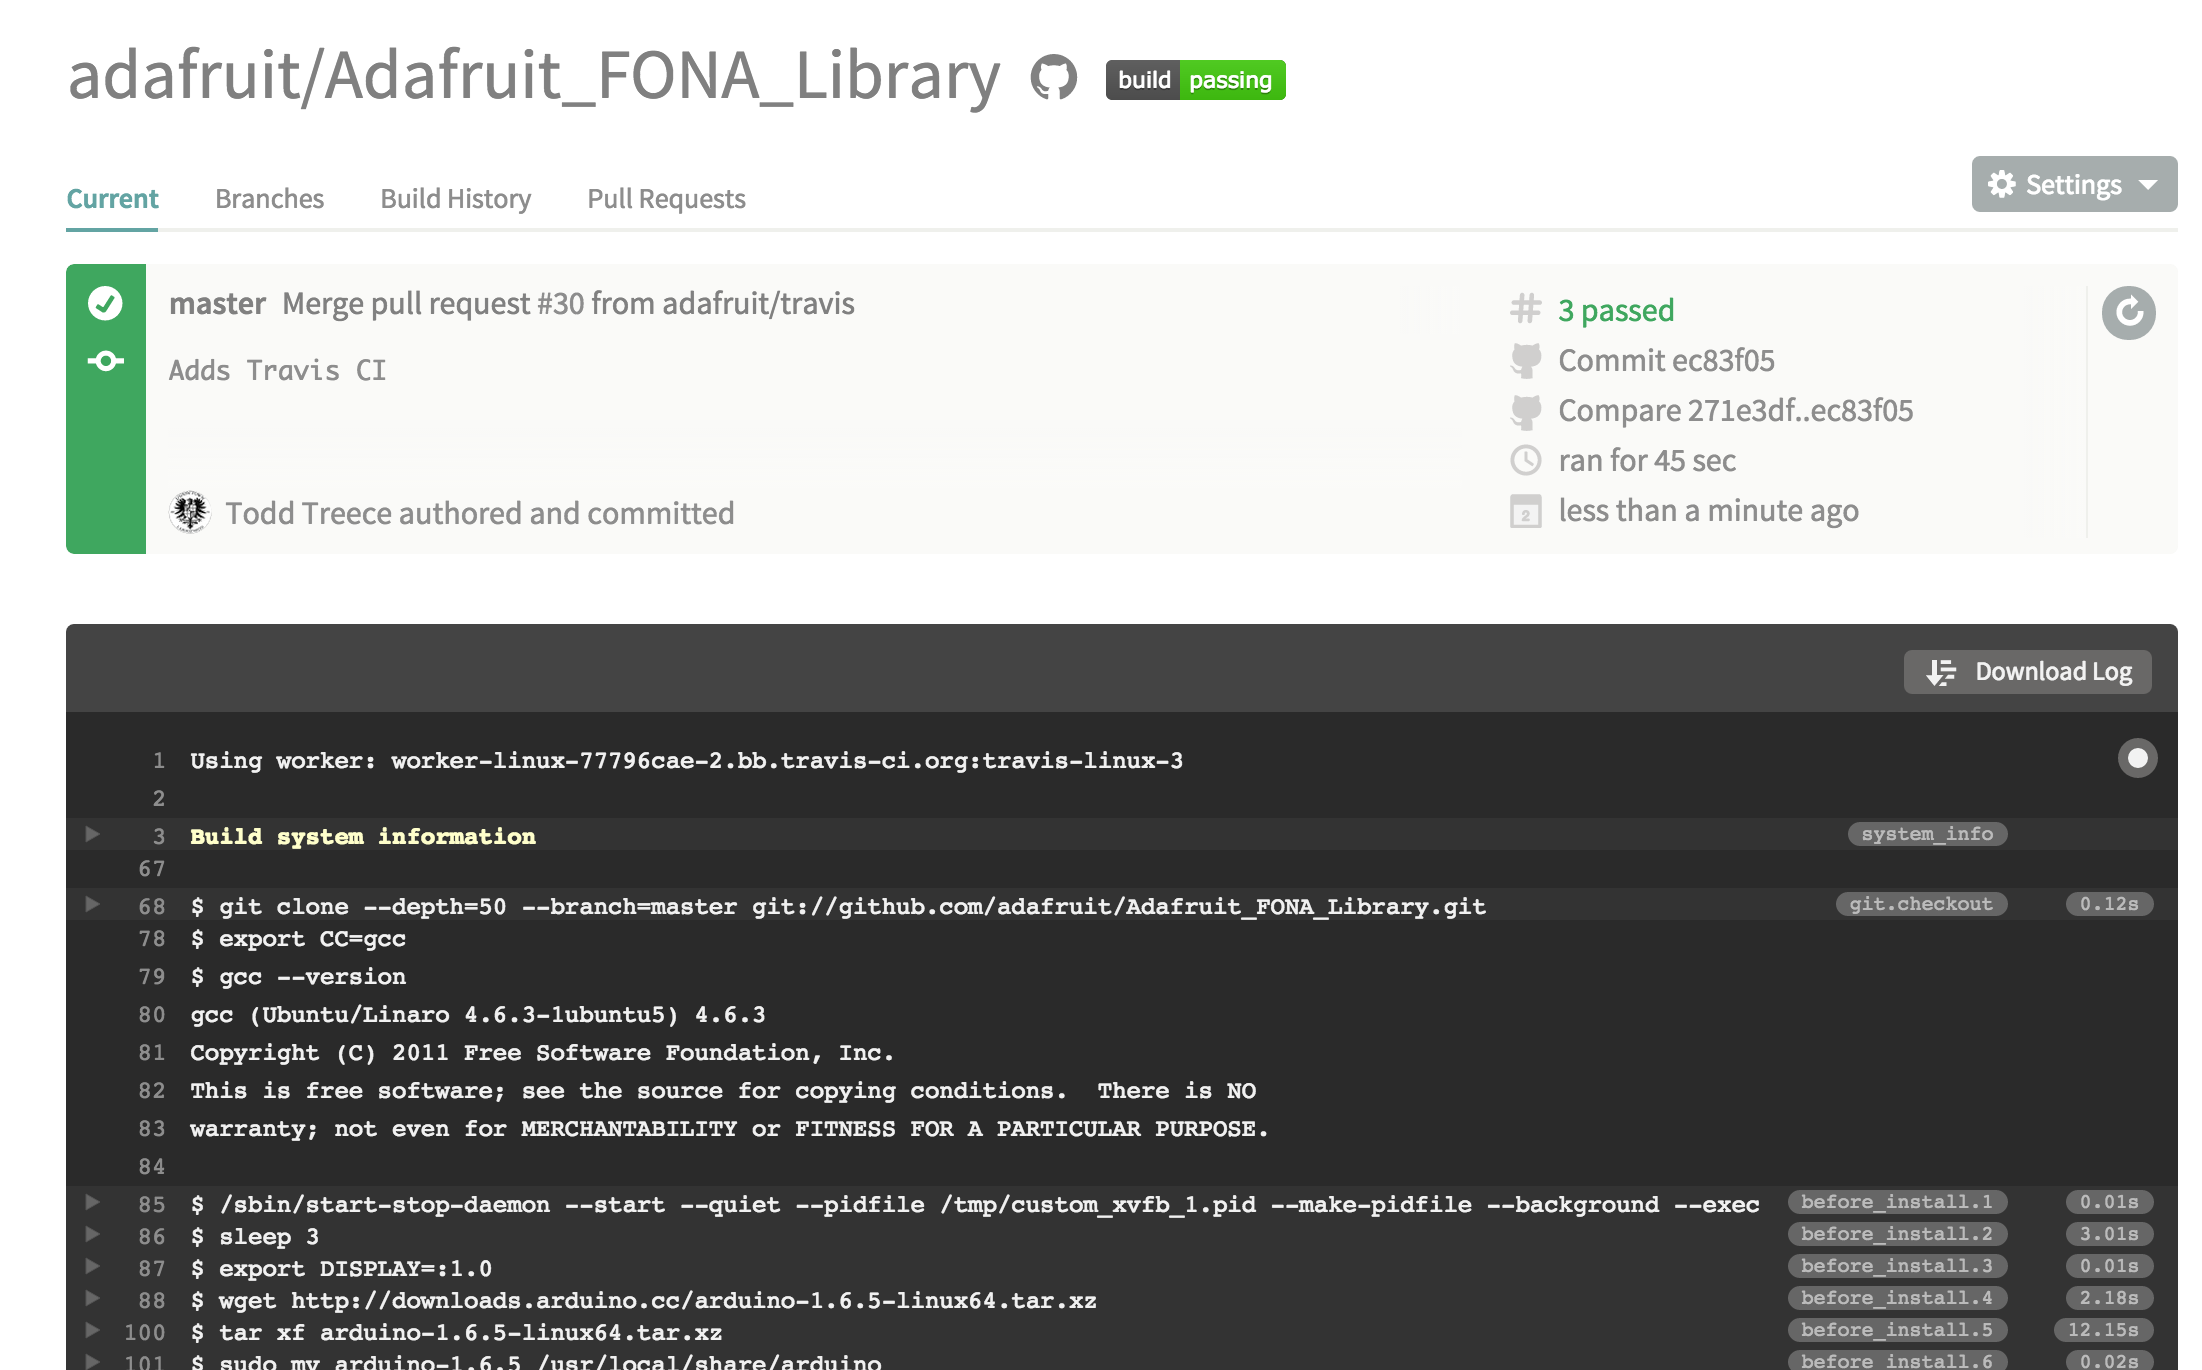
    First Attempt: Build Verification using Travis CI

    We had previously attempted automated build checking using Travis CI, and that method works great for checking if sketches build on multiple platforms.

    Travis CI

    As you may have guessed, this leaves us with a huge blind spot. A passing build does not mean the code will do what you expect it to do.

    Second Attempt: Manual Compatibility Testing

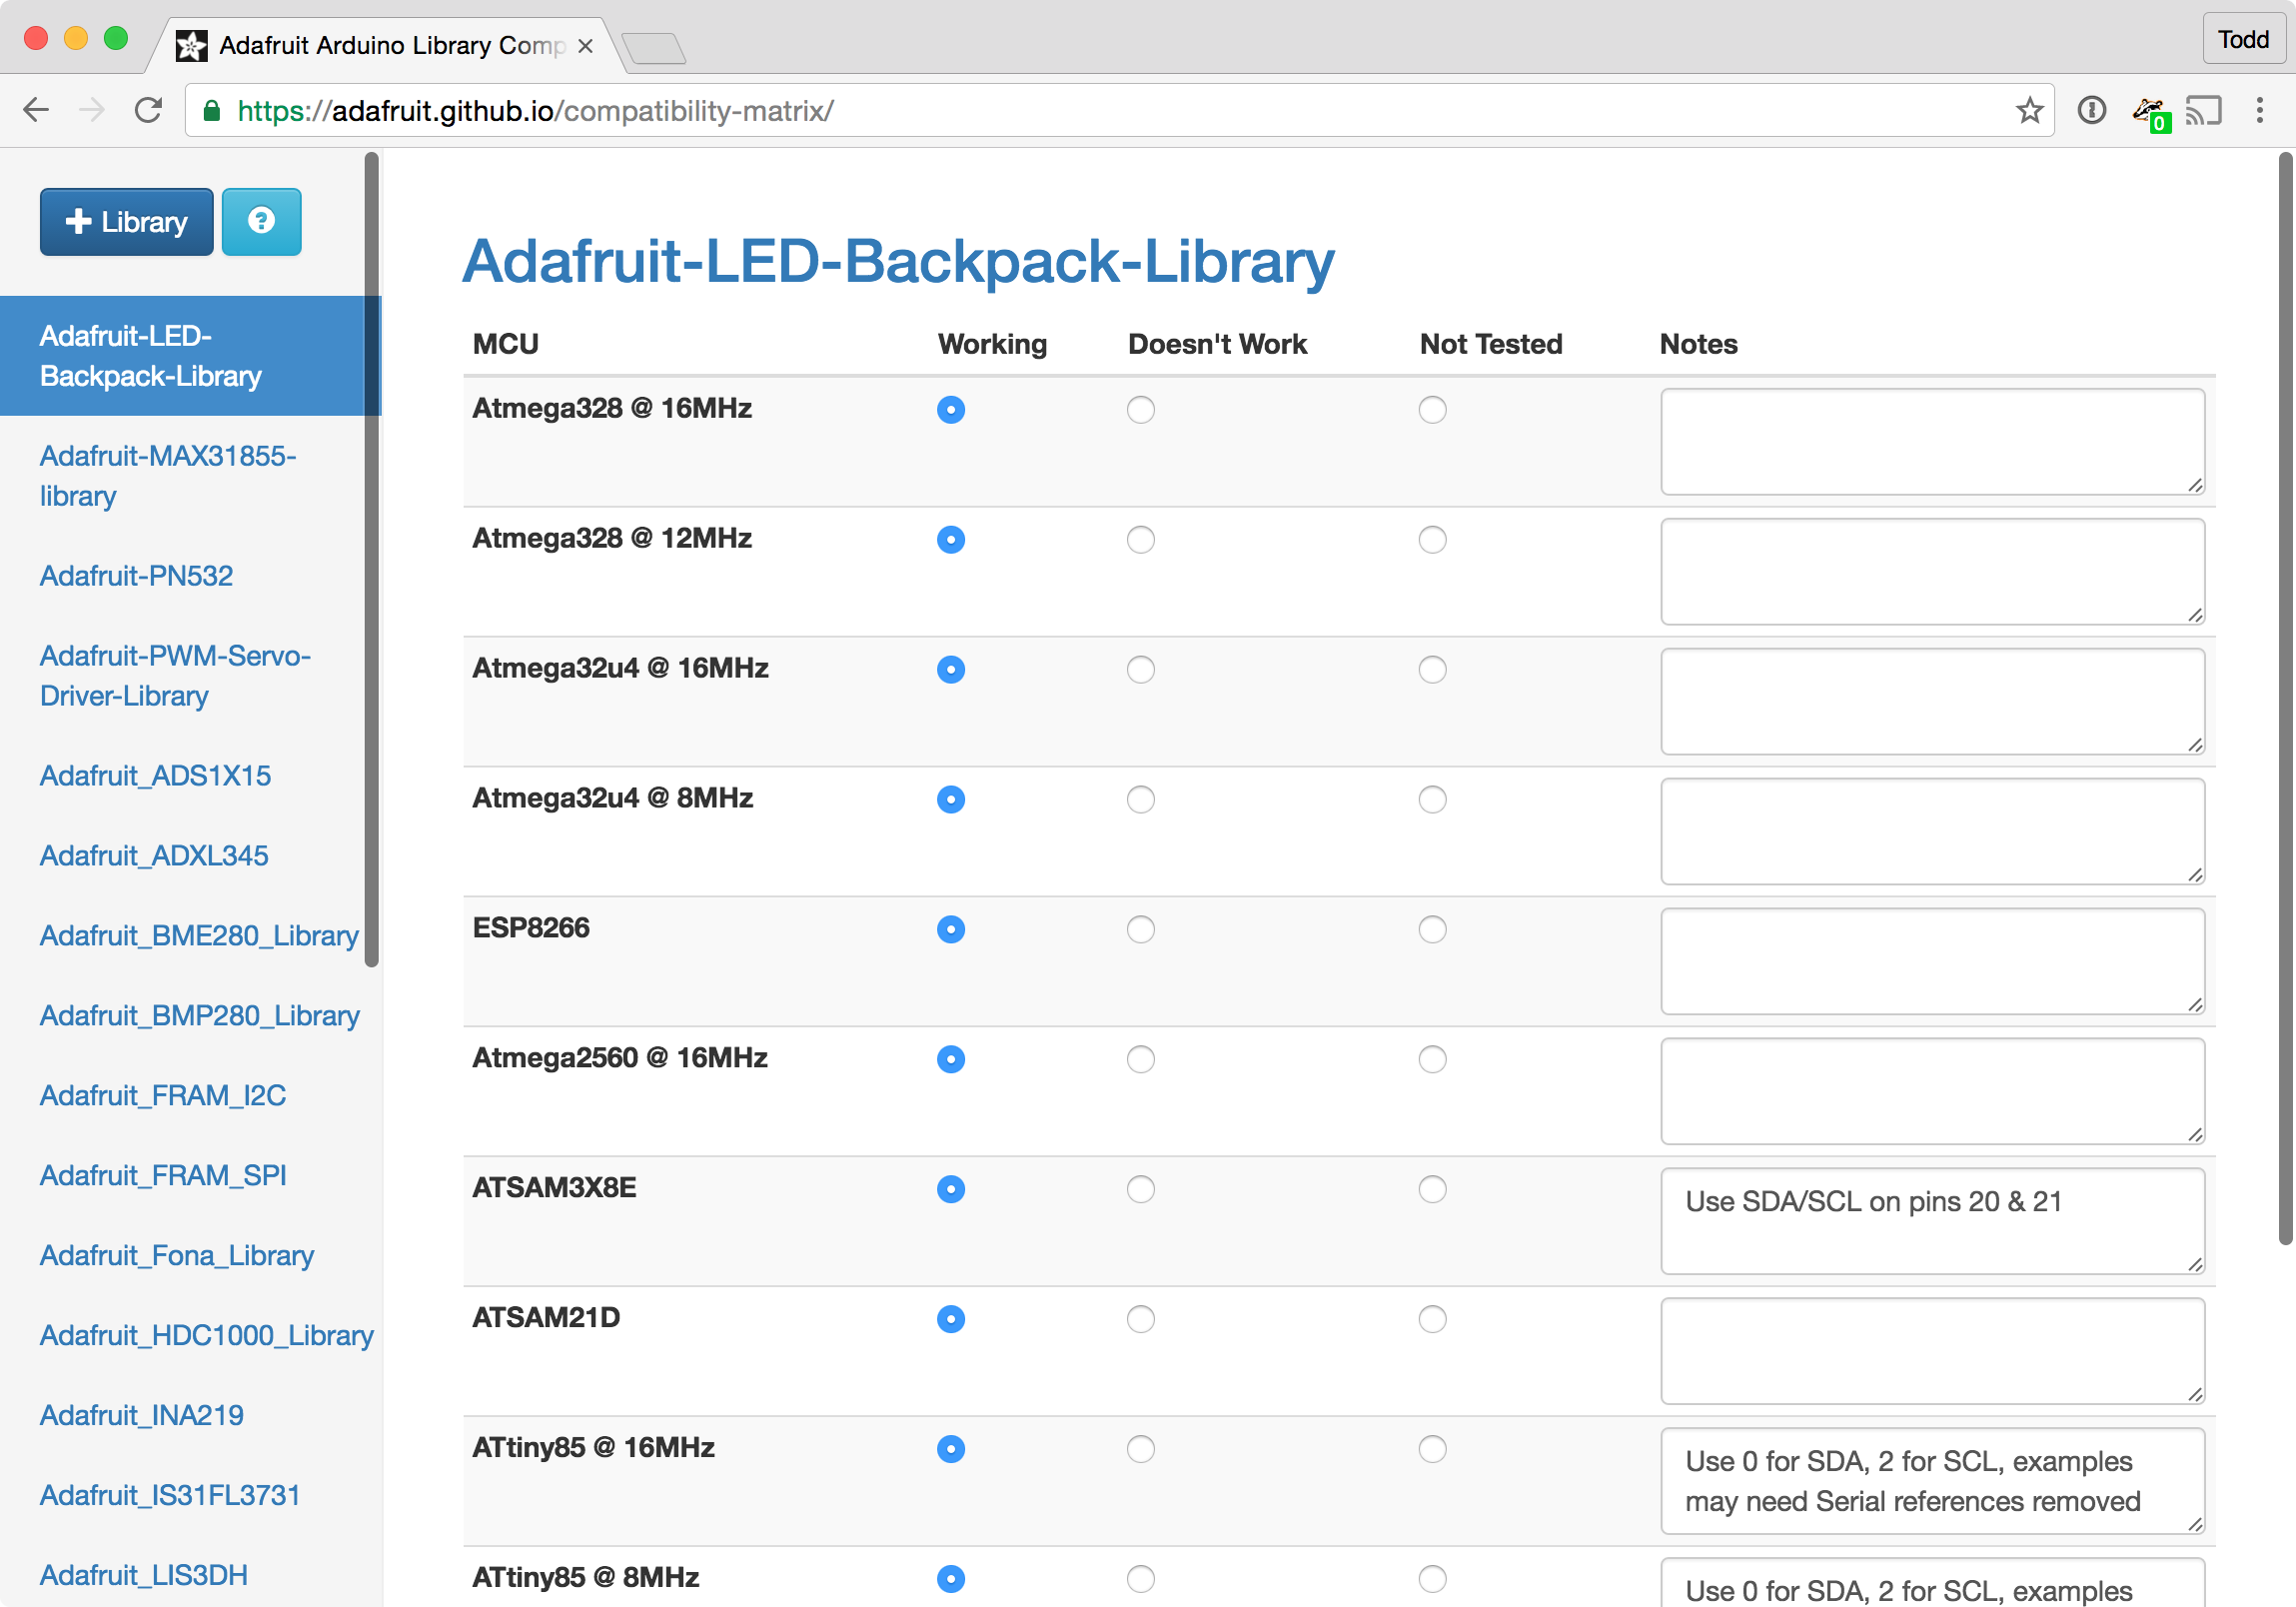
    Our next attempt involved building a ‘compatibility matrix’ web app that allowed for easy logging of the results of manual tests on supported platforms. The app pushes test results to a GitHub repo as JSON (in case we need to access it programatically). It also automatically adds/updates a compatibility table in the README of the target library.

    Compatibility Matrix

    Here’s an example of the README output:

    Compatibility README Example

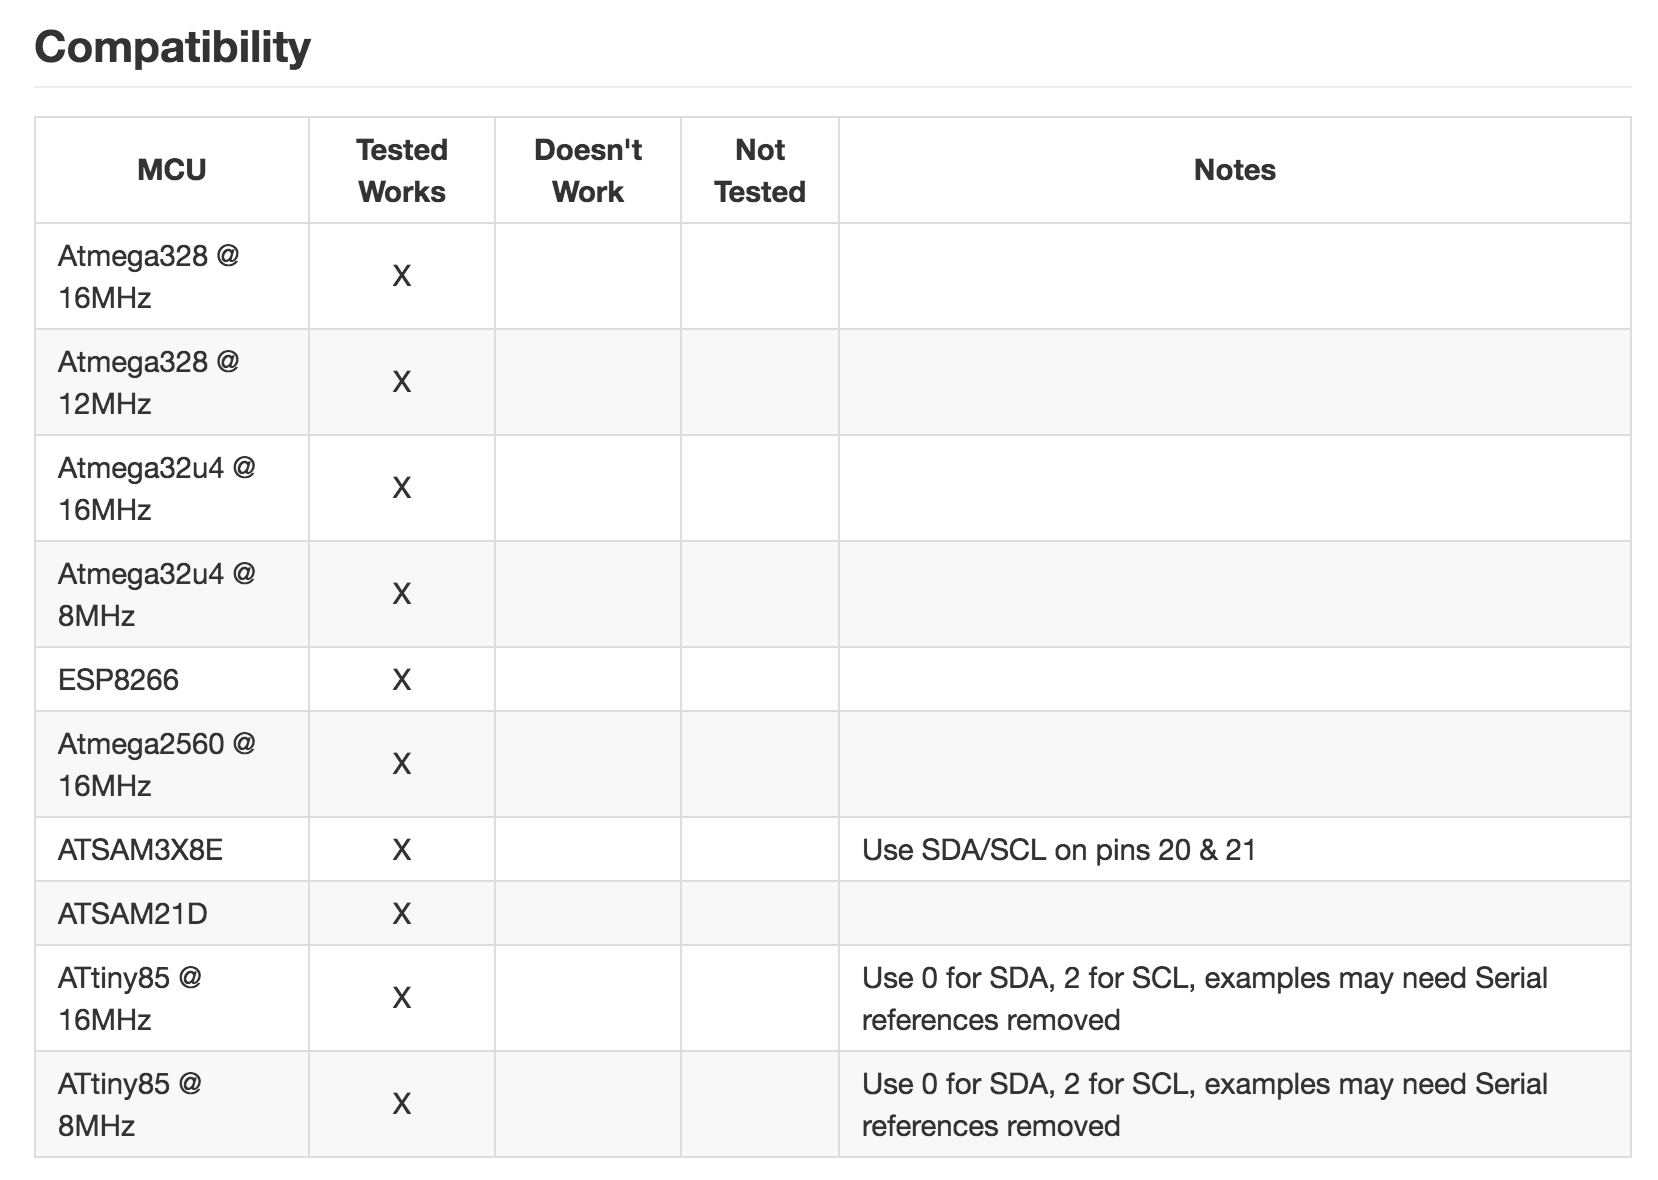
    This method is very effective for answering “Does this change work?”, but it is very impractical to manually test the daily changes to libraries on every supported platform.

    Latest Attempt: Running Tests on Hardware

    Our latest approach to this problem uses Jenkins CI running on an AWS EC2 instance, and small fleet of local Raspberry Pi test nodes. Each node uploads and runs unit & integration tests on hardware attached to USB ports.

    Hardware

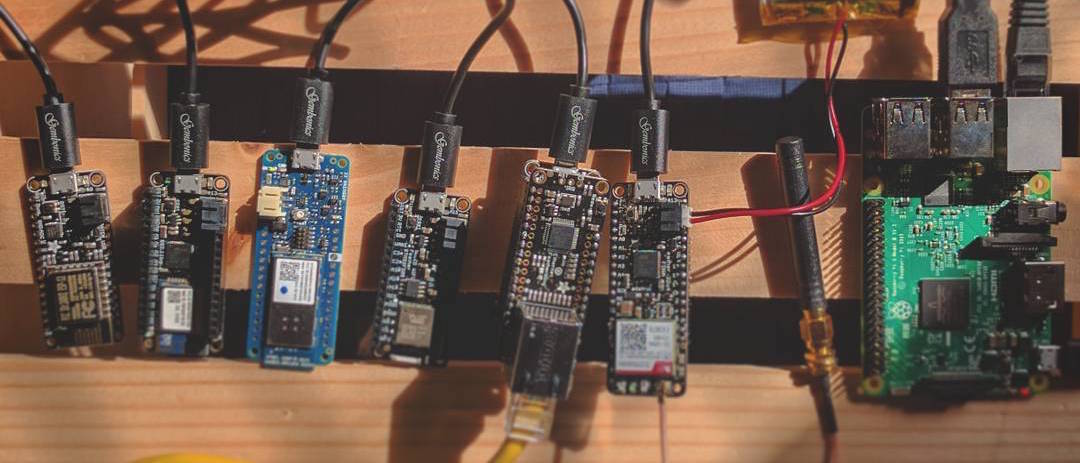
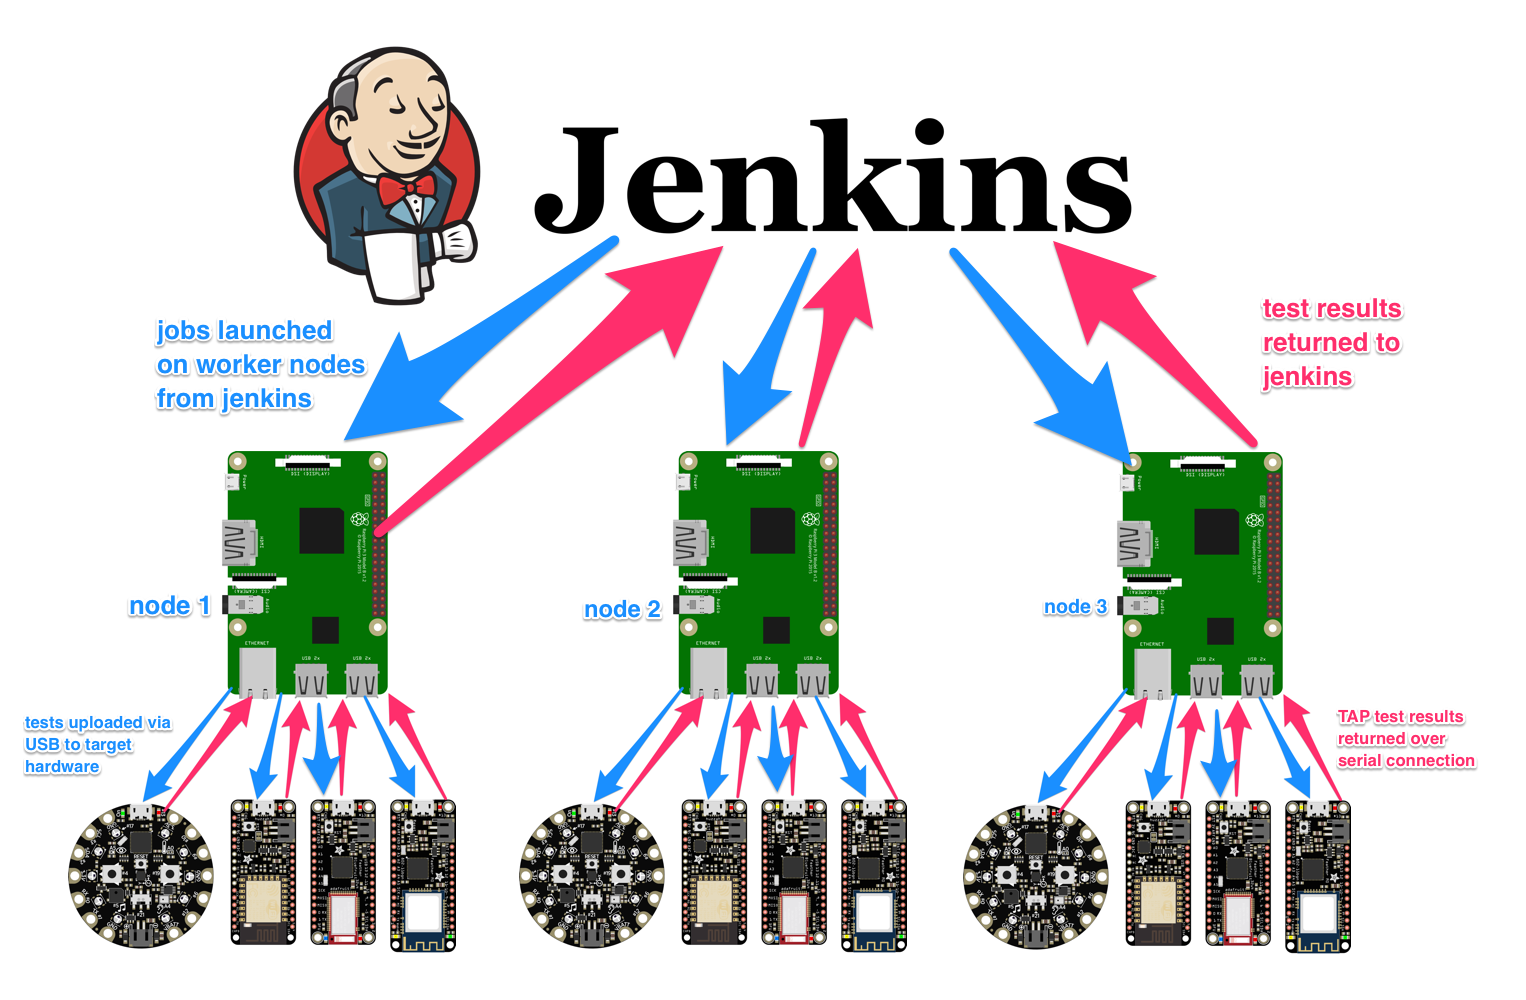
    Each Raspberry Pi can support multiple platforms, and each platform can be targeted by the test. The tests themselves output results using the TAP protocol over a serial connection, and the Raspberry Pi sends the results back to Jenkins so we are aware when builds fail.

    Here’s a visual overview of how it works:

    Jenkins Workflow

    Test status can be monitored in real time from anywhere, and we are able to view the raw console output from the test nodes when needed.

    Jenkins Stage View

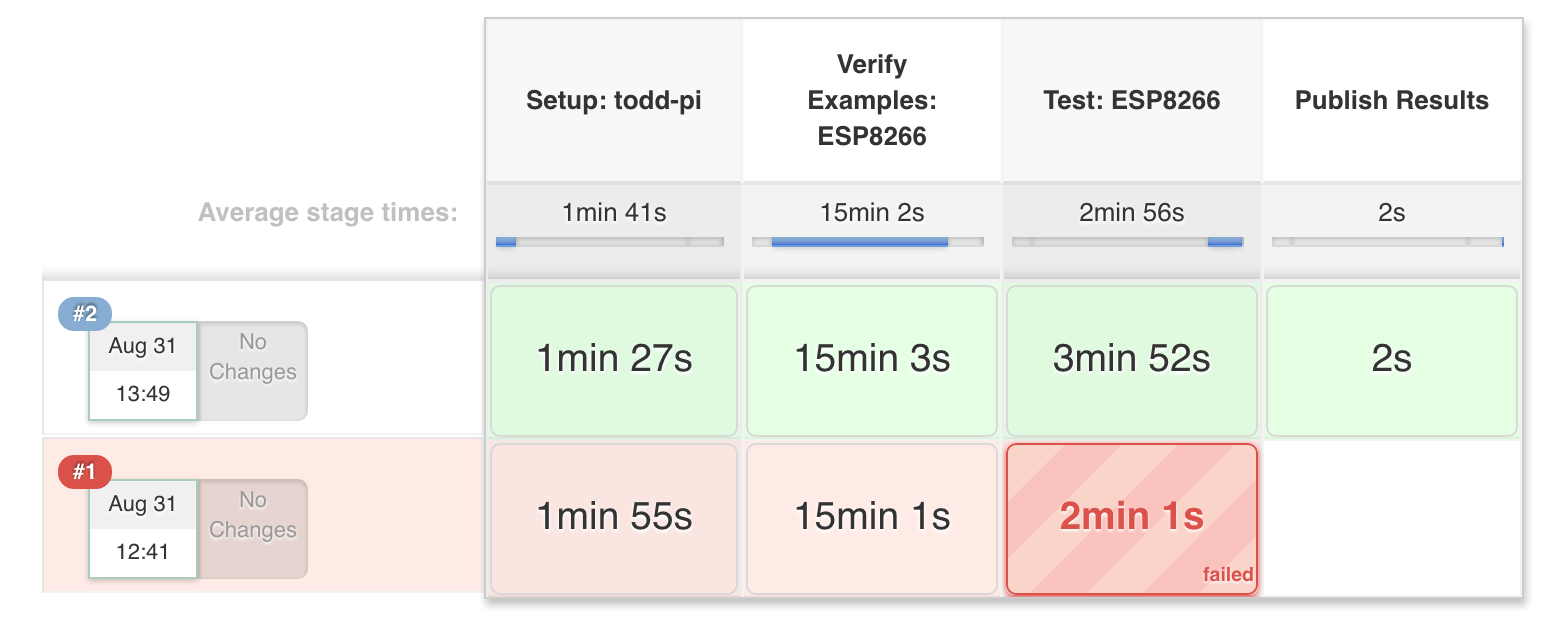
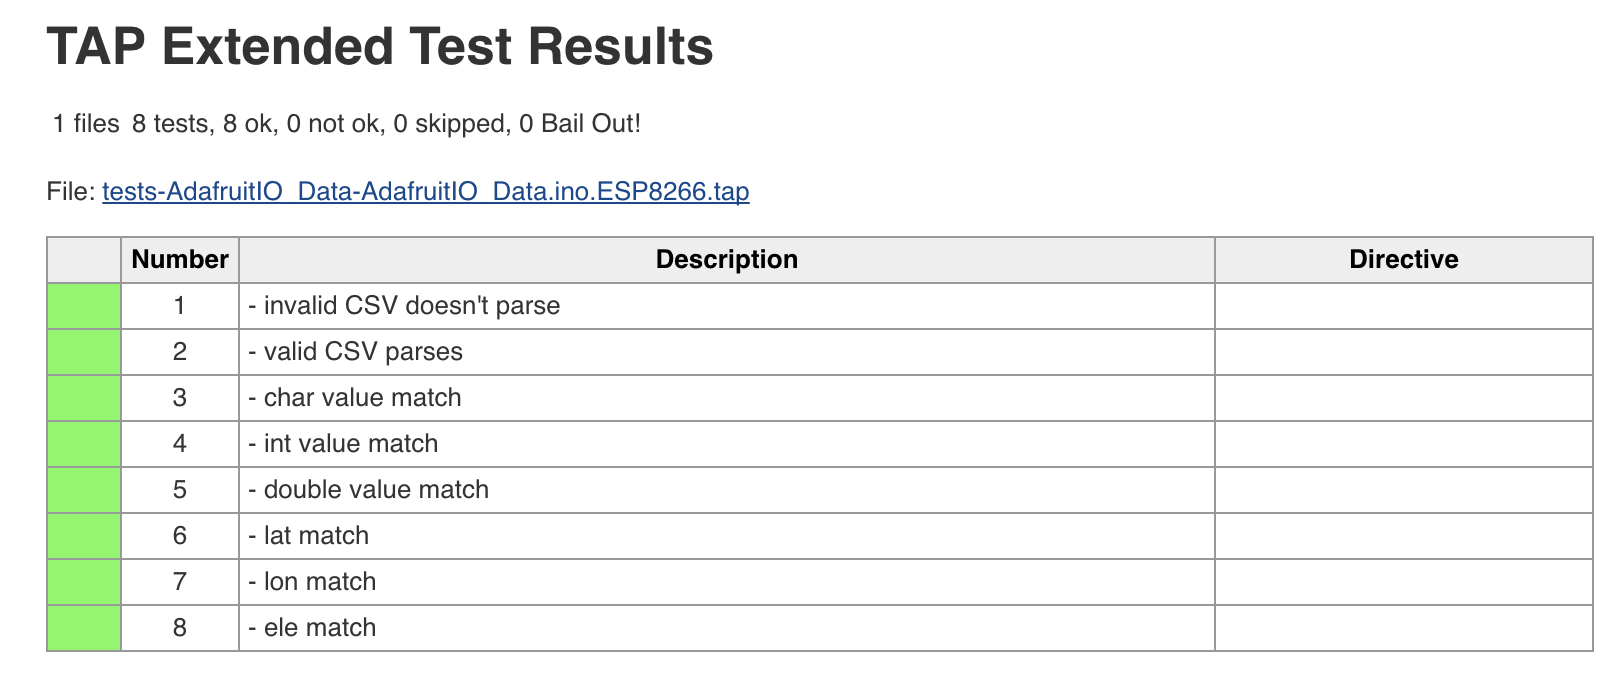
    TAP results are also parsed and attached to each build:

    Jenkins TAP View

    We will be sharing the details of this in a tutorial soon, but if you would like to take a look at our early experiments with Jenkins, head to jenkins.adafruit.com or check out our Jenkins Pipeline Library on GitHub.

    read more →
  • Sending Commands to Multiple EC2 Instances Using dsh

    We are moving Adafruit IO’s node.js services to a group of t2.nano EC2 instances, and I wanted to document my dsh setup. I used to use it for managing the backend workers when working on data.sparkfun.com. It came in really handy when I needed to quickly check or kick anything on the servers.

    First, you will need to install dsh using brew, apt-get, yum, etc:

    $ brew install dsh
    

    You will need to make a couple config directories for your user:

    $ mkdir -p ~/.dsh/group
    

    Create a new dsh.conf file using your favorite text editor:

    $ vim ~/.dsh/dsh.conf
    

    Paste the following config into ~/.dsh/dsh.conf, and save the file:

    showmachinenames = 1
    remoteshell = ssh
    

    Now, you can create a dsh group for the set of servers you would like to send commands to. Create a new file called example in the ~/.dsh/group folder using your favorite text editor:

    $ vim ~/.dsh/group/example
    

    Enter the host names for your servers, and save the file:

    example-1.uniontownlabs.org
    example-2.uniontownlabs.org
    example-3.uniontownlabs.org
    example-4.uniontownlabs.org
    

    Now you can send commands (like uptime) to all servers in the group using the following command:

    $ dsh -g example -w 'uptime'
    example-1.uniontownlabs.org:  14:17:44 up 17:15,  0 users,  load average: 0.08, 0.03, 0.05
    example-2.uniontownlabs.org:  14:17:43 up 16:36,  0 users,  load average: 0.00, 0.01, 0.05
    example-3.uniontownlabs.org:  14:17:45 up 16:41,  0 users,  load average: 0.00, 0.01, 0.05
    example-4.uniontownlabs.org:  14:17:45 up 16:41,  0 users,  load average: 0.00, 0.01, 0.05
    

    Using -w will send the command to each server in the order they appear in the group config, and will wait for a response before continuing. If you want to send the commands concurrently to all servers in the list, use the -c option to send the command:

    $ dsh -g example -c 'uptime'
    example-1.uniontownlabs.org:  14:22:42 up 17:20,  0 users,  load average: 0.00, 0.01, 0.05
    example-3.uniontownlabs.org:  14:22:42 up 16:46,  0 users,  load average: 0.00, 0.01, 0.05
    example-2.uniontownlabs.org:  14:22:41 up 16:41,  0 users,  load average: 0.00, 0.01, 0.05
    example-4.uniontownlabs.org:  14:22:42 up 16:46,  0 users,  load average: 0.10, 0.05, 0.05
    

    You can get an interactive shell for all servers in the group by using the -c and -i commands together. Use CTRL-D to exit the session:

    $ dsh -g -c -i
    
    read more →